Running, lifting, cheesecake…a little bit of everything…

January 10, 2018

I feel like I still haven’t slowed down since Christmas; granted our last Christmas get together was finally celebrated this past Saturday and today is my hubby’s birthday, so maybe after today things will slow down a little bit. So anyway, I’m not intentionally slacking on the blog, I’m just busy with other things..including baking and running!  I ran Friday in the cold, despite having a ‘snow day’ due to cold temperatures, then had to take Saturday off to get ready for our Christmas get together, and Sunday I had my alarm set, but at 6am the temperature was -16, so that made the decision to roll over and go back to bed a little easier!  Although I was tempted to run later that day when my hubby said I ‘couldn’t possibly run in this weather.’  Anyway, Monday, when I finally got to run again, it was 20* and honestly felt like a HEAT WAVE compared to the zero degree days all last week. The air had that eerie abnormally warm feeling, or as if a warm southern breeze was blowing although it was cold out; I’m not kidding, it’s sad when 20* feels like a heat wave!  Today it was back down to 15*, but still better than zero! And today was nice because the roads were clear and dry! It felt so much more effortless running!

Tuesday, although it was another warm morning at 30* and I was SO itching to run, I had made up my mind that I had to get back into my routine of strength training at least once a week, which for me is normally Tuesday.  I hadn’t lifted since late October when my back issues started; I didn’t want to make anything worse, but in the mean time I have lost a lot of strength in my core and that has made the back/hip issues worse.  Although I have ran more in the past year than ever before, I feel like this is the worst shape I’ve ever been in; I’ve got the post-holiday-my-pants-are-too-tight feeling going on and it’s not fun! Time to get back in the swing of things, I hope.

Don’t worry, unfortunately I still like to eat (that’s my biggest problem; for as much as I run I should be way thinner) and will still have yummy recipes to share with you.  As I shared on facebook last Friday, I was making one of my husband’s favorites, Dulce De Leche Cheesecake, for our Christmas get together with his family and doubling as a celebration for his birthday as well as his grandma’s whom he shares a birthday with.  He first had this cheesecake at the Cheesecake Factory many years ago (8 or 9? now); I made one similar a few years ago, but it was lacking that creamy topping that the Cheesecake Factory’s had.  I found this ‘copycat’ Cheesecake Factory recipe here..  I was excited because it had some sort of topping; but had I read the recipe closer I would have realized, like I did while I was actually making the topping, that it wasn’t the rich creamy topping Chris had previously liked, but just a browned butter, brown sugar frosting.  Everyone seemed to like it but, it was a bit too sweet for my liking and I preferred it without the frosting topping.  So I will still be on the lookout for a recipe similar to the one he enjoyed previously! If you have come across one, leave a link in the comments below!

dulce de leche

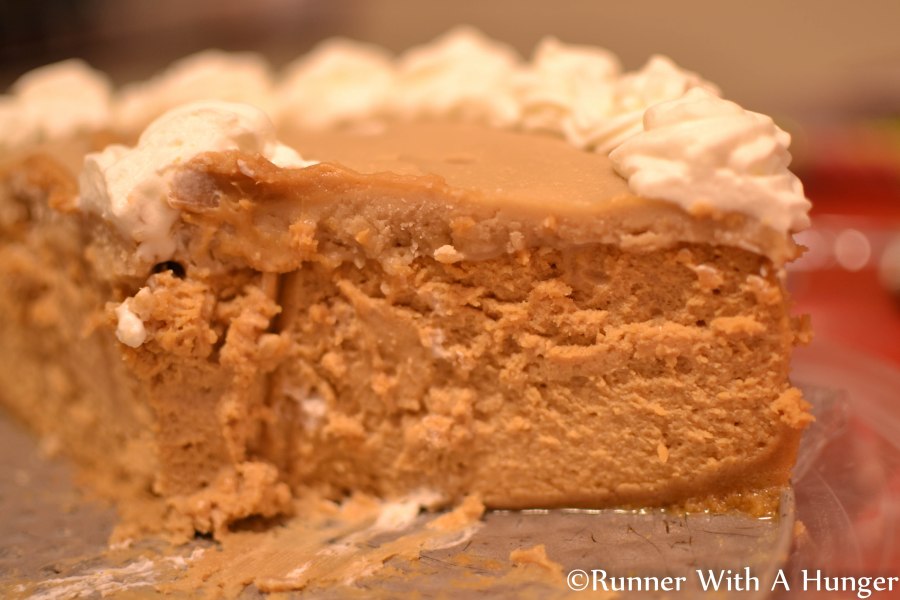
Not the best picture but I guess it’s a good sign that its nearly gone by time you get to snap a picture!  The crust made of golden Oreos was a nice touch and, FYI the Dulce De Leche sauce was difficult to find (coming from a rural area); be sure to plan ahead and buy online or I was finally able to find it in the international isle at Tops grocery store.  (I found sites through pinterest that instructed on how to make your own Dulce De Leche sauce as well; but to do it right takes hours.)

Enjoy!

Christmas get together…

December 28, 2017

Our family has attended many Christmas get togethers so far this year, with two more to go actually.  In addition to making time for family over the holidays, we also make time for our friends as well. Tonight we had a Christmas dinner followed by a game night with our ‘life group’ or church family. We are so thankful for these people we ‘do life with.’ They are definitely God given friendships that have formed from meeting regularly, discussing God and the weekly sermons, the things going on in our day to day lives. It’s a great feeling to have the support of a group of friends who genuinely care and offer helping hands when needed, and are always there to pray for or with you. And of course we’ve all gotten really good at laughing and having fun together; tonight was an opportunity to do just that and enjoy a great meal together.

Our meal tonight was one that tops all others. One of the families in our life group makes a ‘Turducken;’ this was our second time enjoying this combination of a turkey, duck, and chicken. I can’t imagine the time and effort that goes into the days of preparation for this triple bird meal. Our friend has seemed to perfect this delicious meal, as we were able to eat the tender meat with nothing more than plastic forks; so moist and delicious! We appreciated the meal as well as the time with our friends. I think the thing that makes our life group work is that it’s a priority to all of us; we make time to meet and look forward to all getting together.

My contribution to the meal was- you guessed it- a dessert. I initially made a grasshopper cheesecake yesterday, then late last night I remembered our friend and the chef of the turducken, doesn’t like the chocolate mint combination. So this morning I began to look for a different recipe to make, and one that I had all the ingredients for as I was longing to finally have one day where I didn’t have to go anywhere; it’s also less than 5* out today! Anyway I chose to make a brownie bottom cheesecake with a cookie dough topping. Thankfully it seemed to turn out pretty well; I say this because I have had my fair share of flops in the past month. Oy.

brownie bottom cookie dough cheesecake

Anyway, the recipe was adapted from the chunky chef’s. I love brownies, and cheesecake, but could do without the cookie dough. My honest review was that it was too sickening sweet for my liking, but otherwise it turned out just fine and others seemed to enjoy it (thankfully).

brownie bottom cookie dough cheesecake3

Brownie Bottom Cookie Dough Cheesecake
Brownie layer:
1 stick unsalted butter (softened)
3/4 cup semi-sweet chocolate chips
1 cup sugar
2 eggs
1/4 cup milk
1 cup flour

Cheesecake Layer:
3 (8oz) pkg of cream cheese
1 cup sugar
4 eggs
1 tsp vanilla
1/2 cup sour cream or greek yogurt
1 Tbsp flour

Cookie Dough Layer:
1 stick margarine (softened/almost melted)
1/2 cup brown sugar
1/4 cup white sugar
2 Tbsp. milk
1 tsp vanilla
1 1/4 cup flour
1/2 cup mini chocolate chips

Chocolate topping:
1/3 cup MILK chocolate chips
1 tsp vegetable oil

Prepare a 9″ spring form pan by covering bottom with parchment paper and then spraying with cooking spray. Preheat the oven to 350*.
To make the brownie layer, in a saucepan melt the butter and chocolate until smooth, stirring often. Remove from heat and stir in sugar. Allow to cool for 5 minutes, stirring occasionally to help speed up the process.
In a bowl combine chocolate mixture, milk, and eggs. Then add in flour until combined. Pour batter into prepared pan and bake for 25-28 minutes. (Once brownie is removed from oven, reduce oven temp. to 325*.)
Begin the cheesecake layer with cream cheese and eggs that have been allowed to come to room temperature. Combine cream cheese and sugar and vanilla until smooth. Then add sour cream or greek yogurt (I would normally recommend using plain greek yogurt, but all I had this time was vanilla greek yogurt which worked fine!). Add each egg, one at a time. Remember to scrape down the sides of your bowl with a spatula. Lastly, gently mix in the 1 Tbsp of flour. Pour in pan over brownie crust, Bake for 50 minutes; or until the middle is still ‘jiggly’ but the rest/outer edge is set. (Take a knife and run around rim of cheesecake to help prevent cracking as it cools and pulls away from edge of pan.)
Cool gradually in oven for 30 min or so, less time if appears to begin cracking. Then cool on counter further before placing in refrigerator. I cooled for several (4?) hours before adding the cookie dough and chocolate topping.
To prepare cookie dough, simply combine all ingredients in the order listed. Then spread over top of chilled cheesecake. Melt the milk choc. Chips and vegetable oil in microwave safe bowl and drizzle over the top of the cookie dough layer. I placed melted chocolate in piping bag so that I had more control over where the chocolate went; but this would not be necessary.
Enjoy!

brownie bottom cookie dough cheesecake2

My 5 best tips for making cheesecake…

December 11, 2017

Many people feel intimidated about making cheesecake.  It’s definitely one of my favorite desserts to make (and eat)!  There are soooo many different variations and creations you can make… and let’s face it; it tastes way better than cake! (I’m not much of a cake fan at all.)

More often than not I tend to bring desserts to get-togethers because I love to bake; and I often choose to bring cheesecake.  Some of my favorites include: Triple citrus cheesecake, German chocolate cheesecake, grasshopper (mint/chocolate) cheesecake, and most recently, white chocolate peppermint cheesecake.  You can find more information on the white chocolate peppermint cheesecake below.

First, I want to share with you some tips for making cheesecake that will hopefully make the process seem a little less daunting. Please keep in mind that I do not have a culinary degree or any formal training related to baking/cooking; all of what I know, and am sharing with you is just tips that I’ve read and learned along the way from my own experiences. For any professionals reading, feel free to leave further comments with your own useful information for us to all benefit from. Thanks!

Tip #1: Follow the recipe.  Yes, some of you – you know who you are – tend to improvise or not completely adhere to the recipe.  There is a reason it says to mix things a certain way or in a certain order; if you want your cheesecake to turn out, please do as the recipe says.  A perfect example is to add the eggs in one at a time.  Which brings me to….

Tips #2:  Do not over mix the cheesecake batter, especially after adding the eggs, as most cheesecake recipes will tell you.  Normally mixing the eggs in is one of the last things you’ll be instructed to do, one at a time, and only mix just until incorporated.  Over mixing will lead to a cracked cheesecake.

Tip #3:  Most (not all) of my cheesecake recipes call for a tablespoon or two of flour; this helps with the consistency and to prevent cracking as well.

water bath.jpg

Tip #4:  Using the water bath baking method will help achieve that perfect creamy consistency.  Make sure you thoroughly cover the outside of the spring form pan (yes, extra tip – a spring form pan is a must!) with a couple layers of foil.  I crisscross the layers and bring them up the sides to ensure it’s entirely covered; you do not want water seeping in the bottom of your pan and making your crust soggy. Ick.  Then place prepared pan full of contents in a larger baking pan; I use my large roasting pan.  Fill with hot/warm water surrounding the cheesecake until it reaches 2/3 or ¾ way up the sides of the spring form pan.  (If your recipe didn’t already call for a water bath, you may need to adjust the baking temp and/or time. You may also need to pre-bake the crust depending on what you’re using.) I typically bake in a water bath at 325* for 1 hour. Then rest in the water/oven a little longer with oven turned off to allow further cooking.  Depends on how big/thick your cheesecake is as well…. And how it looks; which leads us to …

Tip #5:  The hardest part can be determining when the cheesecake is done or when it is time to remove it from the oven, as there isn’t a simple test like inserting a toothpick. Unfortunately, with cheesecake, it needs to be removed from the oven before it looks like it is completely done; it will still have a ‘jiggly,’ unset appearance in the middle.  The outside 2-3 inches (depending on the size of your cheesecake) should be set, or more firm.  If it starts to appear like it is becoming dry or you see a small crack start to form, or any type of separation occurring – I would remove it from the heat.  It is also best to remove it from the heat gradually, for example turn off the oven and possibly even crack open the oven door. It is also best to let is cool before moving to the refrigerator.

Now for the recipe I promised to share with you:  White Chocolate Peppermint Cheesecake (adapted from ‘Baked by Rachel’‘s recipe). It’s funny that I love this cheesecake, because I am not a fan of white chocolate at all and I’m not in love with peppermint either.  However, the white chocolate taste is very subtle and the combination of the chocolate crust and peppermint bark throughout the cheesecake is like a refreshing candy cane dipped in chocolate. This is the perfect dessert for the Christmas season!

white peppermint.jpg


White chocolate peppermint cheesecake
(Adapted from ‘Baked by Rachel’)

First you will need to make the peppermint bark:

5 oz white chocolate
5 oz dark or milk chocolate (I used dark)
2 tsp vegetable oil (divided)
½ tsp peppermint extract (divided)
Crushed candy canes (approx. 2-3)

Place dark chocolate and 1 tsp vegetable oil in microwave safe bowl, microwave in 20 second intervals, stirring occasionally until melted. Stir in ¼ teaspoon peppermint extract. Spread on cookie sheet lined with wax paper and sprinkle with approximately half of the crushed candy canes. Chill for at least 30 minutes. Then repeat process using the white chocolate chips. Spread on top of the chocolate mixture, sprinkle with crushed candy canes again, and chill.

pepp bark.jpg

For the cheesecake: Use a 10” spring form pan; prepare for water bath by covering outside with foil.
Crust:
30 chocolate sandwich cookies (not double stuffed), crushed
4 Tbsp butter or margarine, melted

Cheesecake:
4 (8 oz) pkg cream cheese (I use 1 regular and 3 reduced fat; no one ever notices)
1 ¼ cup sugar
2 Tbsp flour
2 Tbsp heavy whipping cream
5 oz (or 2/3 cup) white chocolate
2 ¼ tsp peppermint extract
4 eggs
Dash of salt

Topping:
1/3 cup (or 5 Tbsp) white chocolate
5 oz cream cheese
2/3 cup cool whip topping
2 Tsp sugar
1 tsp vanilla

Directions:
Prepare the peppermint bark ahead of time (best if the day before).
Preheat oven to 350*. Use food processor to crush cookies. Combine cookie crumbs and melted butter. After preparing 10” spring form pan with foil, add cookie crumb mixture and press into pan. Bake for 10 min. Set aside.
Reduce oven temp to 325*
Chop peppermint bark into small pieces and set aside.

Mix cream cheese and sugar until creamy and smooth. Melt white chocolate in microwave or double boiler; let cool a couple minutes then mix into cream cheese mixture. Then add flour, cream, salt, and peppermint extract. Mix well. Then being careful to not over mix, add one egg at a time, beating after each addition, just until incorporated. Stir in half of the peppermint bark pieces, by hand.
Empty mixture on top of crust and then place into larger pan and prepare water bath as directed above.

Bake for 1 hour and 10 minutes, then turn oven off and leave in oven and water bath for another 15-20 min. Then remove and allow to cool. Refrigerate 4 hours or overnight.

For the topping combine all ingredients, starting with white chocolate, cream cheese, and sugar; then add in the cool whip and vanilla. Mix well, until smooth. Remove outer edge of spring form pan and frost with topping. Chill for another 4 hours.
Before serving, sprinkle with bits of crushed peppermint bark, crush candy cane pieces, and top with whipped cream.
Enjoy!

Do you have questions or tips you can share with us? OR cheesecake recipe requests?  I’d love to hear them! Please leave a comment!

Turkey Trot…

November 23, 2017

Thanksgiving is my second favorite holiday (to 4th of July), some of my favorite things are my traditional morning run and cuddling with the kids on the couch to watch the Thanksgiving Day Parade. Today was no exception.  Finished 8 that felt really good- another day with no aches and pains so I was thrilled!

stats.11.23

Spent my entire run praying- thanking God for many things and lifting many people, friends, family, random people, even strangers up in prayer.  It was a great start to my day.  Then after a quick shower I was exactly where I wanted to be – on the couch cuddling with my two kiddos, enjoying the parade.  I love traditions that I grew up with and passing them on to see my children enjoy them as well.

Lastly, the day wouldn’t be complete if I didn’t discuss what I was contributing to the Thanksgiving meal at my in laws this year… 1. Green Bean casserole, the hubby’s fav. 2. Baked Corn (my mom’s recipe) 3. Homemade cranberry relish- MY fav! (recipe below) And 4. I’m always good for a dessert and this is one of my Thanksgiving favorites: ‘Chumpcan’ Pie… Cheesecake, pumpkin & pecan all in one!  I cannot take credit for this beautiful thing… you can find the recipe here: http://www.parsleysagesweet.com/2011/11/15/11750/

DSC_0315.JPG

We all love cheesecake, and then you add the fall flavor of pumpkin, and top it with what is my favorite part, the crunchy, slightly gooey pecan topping; it’s truly the best of all dessert worlds because it doesn’t make you choose between the three desserts after an over satisfying Thanksgiving meal. I chose to make mine in a spring form pan with a graham cracker crust, rather than a traditional pie crust like the recipe calls for (my hubby isn’t a big pie crust fan).  Additionally, the recipe gives you two options for the pecan topping, I went with the traditional pecan pie topping over the ‘gooey’ pecan pie topping- I’m sure either would be delicious though!

To enjoy your own cranberry relish see the simple recipe below.  Each time I make this I think of where the recipe came from (as I do with all handwritten recipes), and this came from a former coworker kindergarten teacher who makes this with her students at their annual kindergarten Thanksgiving feast. So simple and yummy.. if you don’t like the canned cranberry sauce, try this anyway! And if you do like canned cranberry sauce, after one taste of this, I’m sure you’ll never go back!

Cranberry Relish

Combine all in the food processor:

2 (12 oz) bags of fresh cranberries

2 apples (cored) (no need to peel)

2 oranges (I peel one and leave one unpeeled)

2 cups of sugar

DSC_0319.JPG

ENJOY!