Add a little zest to your Oatmeal Cookies…

oatmeal craisin

January 29, 2018

I’ve been meaning to share this recipe since Christmas; I guess it takes a day of being sick on the couch with a nasty sinus cold for me to make time to do so! This is an original recipe of my own, as I wanted to put a holiday twist on the normal oatmeal cookie.  I guess orange zest and craisins wouldn’t have to mean holidays; you could make this cookie anytime your little heart desires!  Enjoy!

oatmeal craisin1

Oatmeal Craisin Cookies with a touch of Orange
1 cup shortening
3/4 cup sugar
3/ cup brown sugar
2 eggs
1 tsp. baking soda dissolved in 1/2 cup milk
3 cups flour
1/2 tsp salt
1 tsp baking powder
2 1/2 cups old fashioned oats
1 tsp vanilla
1 cup craisins (dried cranberries)
Zest from 1 large orange
1/2 cup chopped walnuts (optional)

Cream the shortening and sugars, then add the eggs. Then add the dry ingredients; before completely combined, I then add the baking soda dissolved in milk. Lastly, stir in the craisins, orange zest, and nuts (if desired). Bake at 350* for 10-12 minutes. I remove mine just before they appear done (still moist appearance), to avoid a hard crunchy cookie.

Enjoy!

oatmeal craisin2

Christmas get together…

December 28, 2017

Our family has attended many Christmas get togethers so far this year, with two more to go actually.  In addition to making time for family over the holidays, we also make time for our friends as well. Tonight we had a Christmas dinner followed by a game night with our ‘life group’ or church family. We are so thankful for these people we ‘do life with.’ They are definitely God given friendships that have formed from meeting regularly, discussing God and the weekly sermons, the things going on in our day to day lives. It’s a great feeling to have the support of a group of friends who genuinely care and offer helping hands when needed, and are always there to pray for or with you. And of course we’ve all gotten really good at laughing and having fun together; tonight was an opportunity to do just that and enjoy a great meal together.

Our meal tonight was one that tops all others. One of the families in our life group makes a ‘Turducken;’ this was our second time enjoying this combination of a turkey, duck, and chicken. I can’t imagine the time and effort that goes into the days of preparation for this triple bird meal. Our friend has seemed to perfect this delicious meal, as we were able to eat the tender meat with nothing more than plastic forks; so moist and delicious! We appreciated the meal as well as the time with our friends. I think the thing that makes our life group work is that it’s a priority to all of us; we make time to meet and look forward to all getting together.

My contribution to the meal was- you guessed it- a dessert. I initially made a grasshopper cheesecake yesterday, then late last night I remembered our friend and the chef of the turducken, doesn’t like the chocolate mint combination. So this morning I began to look for a different recipe to make, and one that I had all the ingredients for as I was longing to finally have one day where I didn’t have to go anywhere; it’s also less than 5* out today! Anyway I chose to make a brownie bottom cheesecake with a cookie dough topping. Thankfully it seemed to turn out pretty well; I say this because I have had my fair share of flops in the past month. Oy.

brownie bottom cookie dough cheesecake

Anyway, the recipe was adapted from the chunky chef’s. I love brownies, and cheesecake, but could do without the cookie dough. My honest review was that it was too sickening sweet for my liking, but otherwise it turned out just fine and others seemed to enjoy it (thankfully).

brownie bottom cookie dough cheesecake3

Brownie Bottom Cookie Dough Cheesecake
Brownie layer:
1 stick unsalted butter (softened)
3/4 cup semi-sweet chocolate chips
1 cup sugar
2 eggs
1/4 cup milk
1 cup flour

Cheesecake Layer:
3 (8oz) pkg of cream cheese
1 cup sugar
4 eggs
1 tsp vanilla
1/2 cup sour cream or greek yogurt
1 Tbsp flour

Cookie Dough Layer:
1 stick margarine (softened/almost melted)
1/2 cup brown sugar
1/4 cup white sugar
2 Tbsp. milk
1 tsp vanilla
1 1/4 cup flour
1/2 cup mini chocolate chips

Chocolate topping:
1/3 cup MILK chocolate chips
1 tsp vegetable oil

Prepare a 9″ spring form pan by covering bottom with parchment paper and then spraying with cooking spray. Preheat the oven to 350*.
To make the brownie layer, in a saucepan melt the butter and chocolate until smooth, stirring often. Remove from heat and stir in sugar. Allow to cool for 5 minutes, stirring occasionally to help speed up the process.
In a bowl combine chocolate mixture, milk, and eggs. Then add in flour until combined. Pour batter into prepared pan and bake for 25-28 minutes. (Once brownie is removed from oven, reduce oven temp. to 325*.)
Begin the cheesecake layer with cream cheese and eggs that have been allowed to come to room temperature. Combine cream cheese and sugar and vanilla until smooth. Then add sour cream or greek yogurt (I would normally recommend using plain greek yogurt, but all I had this time was vanilla greek yogurt which worked fine!). Add each egg, one at a time. Remember to scrape down the sides of your bowl with a spatula. Lastly, gently mix in the 1 Tbsp of flour. Pour in pan over brownie crust, Bake for 50 minutes; or until the middle is still ‘jiggly’ but the rest/outer edge is set. (Take a knife and run around rim of cheesecake to help prevent cracking as it cools and pulls away from edge of pan.)
Cool gradually in oven for 30 min or so, less time if appears to begin cracking. Then cool on counter further before placing in refrigerator. I cooled for several (4?) hours before adding the cookie dough and chocolate topping.
To prepare cookie dough, simply combine all ingredients in the order listed. Then spread over top of chilled cheesecake. Melt the milk choc. Chips and vegetable oil in microwave safe bowl and drizzle over the top of the cookie dough layer. I placed melted chocolate in piping bag so that I had more control over where the chocolate went; but this would not be necessary.
Enjoy!

brownie bottom cookie dough cheesecake2

My 5 best tips for making cheesecake…

December 11, 2017

Many people feel intimidated about making cheesecake.  It’s definitely one of my favorite desserts to make (and eat)!  There are soooo many different variations and creations you can make… and let’s face it; it tastes way better than cake! (I’m not much of a cake fan at all.)

More often than not I tend to bring desserts to get-togethers because I love to bake; and I often choose to bring cheesecake.  Some of my favorites include: Triple citrus cheesecake, German chocolate cheesecake, grasshopper (mint/chocolate) cheesecake, and most recently, white chocolate peppermint cheesecake.  You can find more information on the white chocolate peppermint cheesecake below.

First, I want to share with you some tips for making cheesecake that will hopefully make the process seem a little less daunting. Please keep in mind that I do not have a culinary degree or any formal training related to baking/cooking; all of what I know, and am sharing with you is just tips that I’ve read and learned along the way from my own experiences. For any professionals reading, feel free to leave further comments with your own useful information for us to all benefit from. Thanks!

Tip #1: Follow the recipe.  Yes, some of you – you know who you are – tend to improvise or not completely adhere to the recipe.  There is a reason it says to mix things a certain way or in a certain order; if you want your cheesecake to turn out, please do as the recipe says.  A perfect example is to add the eggs in one at a time.  Which brings me to….

Tips #2:  Do not over mix the cheesecake batter, especially after adding the eggs, as most cheesecake recipes will tell you.  Normally mixing the eggs in is one of the last things you’ll be instructed to do, one at a time, and only mix just until incorporated.  Over mixing will lead to a cracked cheesecake.

Tip #3:  Most (not all) of my cheesecake recipes call for a tablespoon or two of flour; this helps with the consistency and to prevent cracking as well.

water bath.jpg

Tip #4:  Using the water bath baking method will help achieve that perfect creamy consistency.  Make sure you thoroughly cover the outside of the spring form pan (yes, extra tip – a spring form pan is a must!) with a couple layers of foil.  I crisscross the layers and bring them up the sides to ensure it’s entirely covered; you do not want water seeping in the bottom of your pan and making your crust soggy. Ick.  Then place prepared pan full of contents in a larger baking pan; I use my large roasting pan.  Fill with hot/warm water surrounding the cheesecake until it reaches 2/3 or ¾ way up the sides of the spring form pan.  (If your recipe didn’t already call for a water bath, you may need to adjust the baking temp and/or time. You may also need to pre-bake the crust depending on what you’re using.) I typically bake in a water bath at 325* for 1 hour. Then rest in the water/oven a little longer with oven turned off to allow further cooking.  Depends on how big/thick your cheesecake is as well…. And how it looks; which leads us to …

Tip #5:  The hardest part can be determining when the cheesecake is done or when it is time to remove it from the oven, as there isn’t a simple test like inserting a toothpick. Unfortunately, with cheesecake, it needs to be removed from the oven before it looks like it is completely done; it will still have a ‘jiggly,’ unset appearance in the middle.  The outside 2-3 inches (depending on the size of your cheesecake) should be set, or more firm.  If it starts to appear like it is becoming dry or you see a small crack start to form, or any type of separation occurring – I would remove it from the heat.  It is also best to remove it from the heat gradually, for example turn off the oven and possibly even crack open the oven door. It is also best to let is cool before moving to the refrigerator.

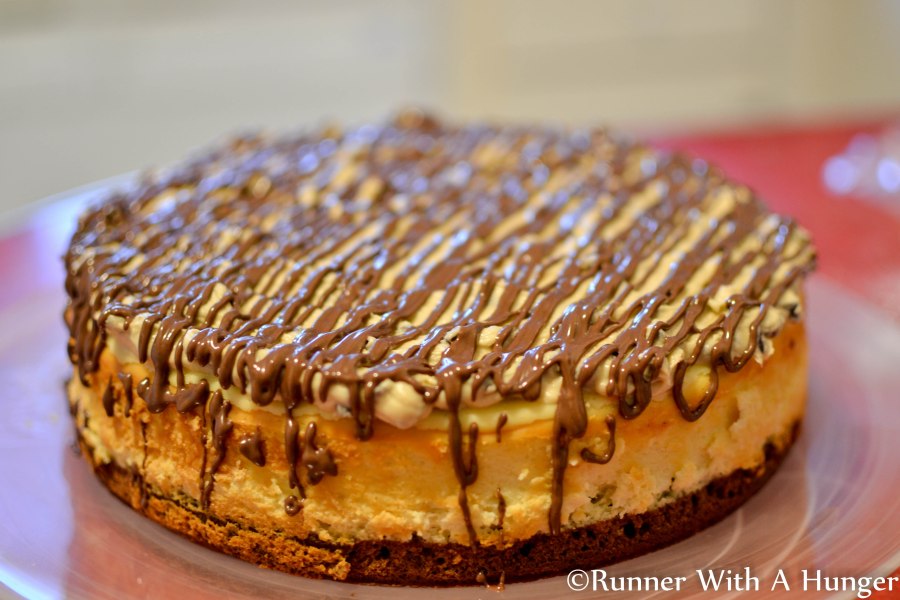
Now for the recipe I promised to share with you:  White Chocolate Peppermint Cheesecake (adapted from ‘Baked by Rachel’‘s recipe). It’s funny that I love this cheesecake, because I am not a fan of white chocolate at all and I’m not in love with peppermint either.  However, the white chocolate taste is very subtle and the combination of the chocolate crust and peppermint bark throughout the cheesecake is like a refreshing candy cane dipped in chocolate. This is the perfect dessert for the Christmas season!

white peppermint.jpg


White chocolate peppermint cheesecake
(Adapted from ‘Baked by Rachel’)

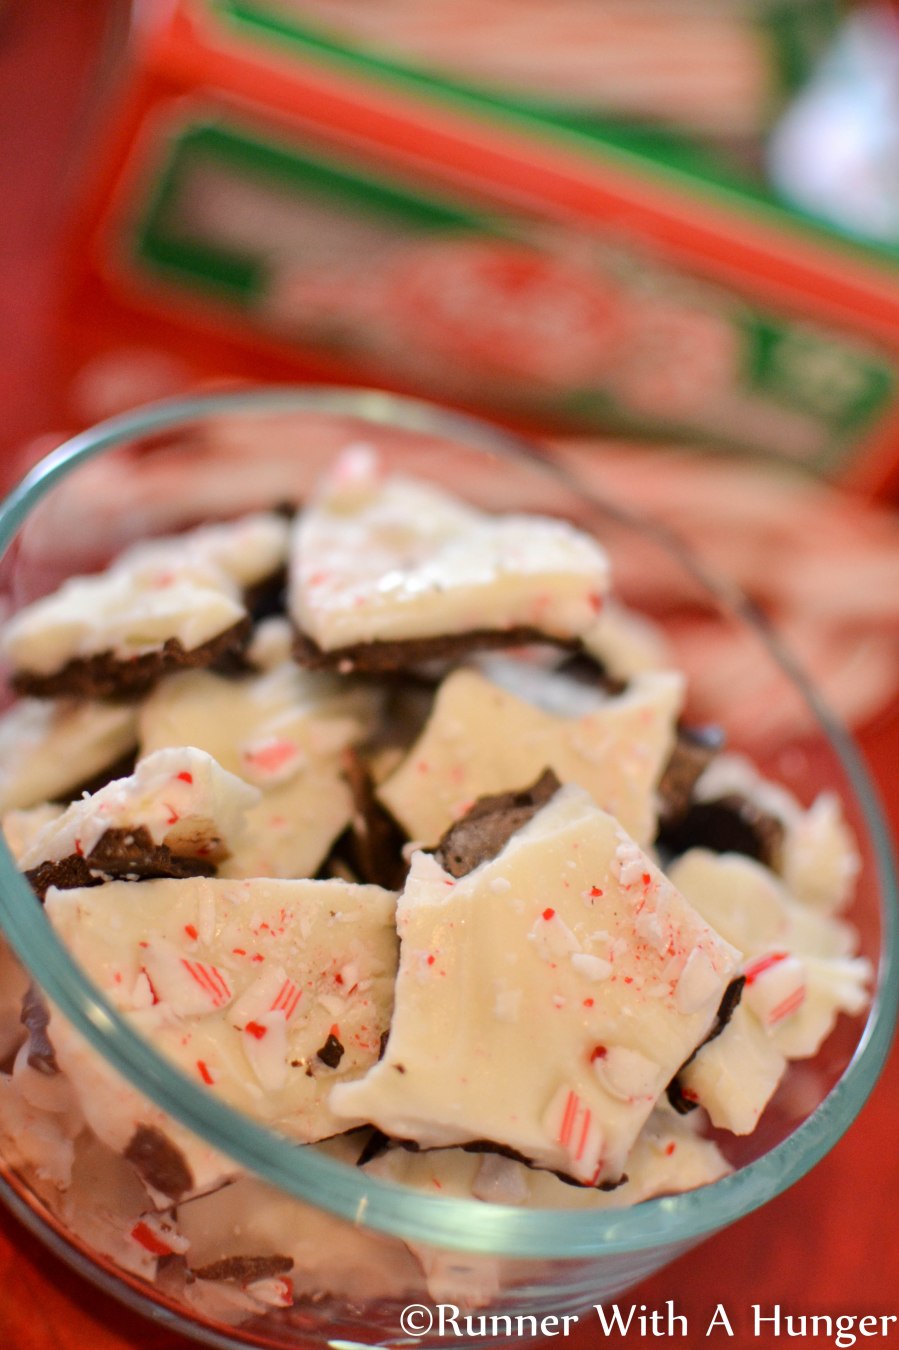
First you will need to make the peppermint bark:

5 oz white chocolate
5 oz dark or milk chocolate (I used dark)
2 tsp vegetable oil (divided)
½ tsp peppermint extract (divided)
Crushed candy canes (approx. 2-3)

Place dark chocolate and 1 tsp vegetable oil in microwave safe bowl, microwave in 20 second intervals, stirring occasionally until melted. Stir in ¼ teaspoon peppermint extract. Spread on cookie sheet lined with wax paper and sprinkle with approximately half of the crushed candy canes. Chill for at least 30 minutes. Then repeat process using the white chocolate chips. Spread on top of the chocolate mixture, sprinkle with crushed candy canes again, and chill.

pepp bark.jpg

For the cheesecake: Use a 10” spring form pan; prepare for water bath by covering outside with foil.
Crust:
30 chocolate sandwich cookies (not double stuffed), crushed
4 Tbsp butter or margarine, melted

Cheesecake:
4 (8 oz) pkg cream cheese (I use 1 regular and 3 reduced fat; no one ever notices)
1 ¼ cup sugar
2 Tbsp flour
2 Tbsp heavy whipping cream
5 oz (or 2/3 cup) white chocolate
2 ¼ tsp peppermint extract
4 eggs
Dash of salt

Topping:
1/3 cup (or 5 Tbsp) white chocolate
5 oz cream cheese
2/3 cup cool whip topping
2 Tsp sugar
1 tsp vanilla

Directions:
Prepare the peppermint bark ahead of time (best if the day before).
Preheat oven to 350*. Use food processor to crush cookies. Combine cookie crumbs and melted butter. After preparing 10” spring form pan with foil, add cookie crumb mixture and press into pan. Bake for 10 min. Set aside.
Reduce oven temp to 325*
Chop peppermint bark into small pieces and set aside.

Mix cream cheese and sugar until creamy and smooth. Melt white chocolate in microwave or double boiler; let cool a couple minutes then mix into cream cheese mixture. Then add flour, cream, salt, and peppermint extract. Mix well. Then being careful to not over mix, add one egg at a time, beating after each addition, just until incorporated. Stir in half of the peppermint bark pieces, by hand.
Empty mixture on top of crust and then place into larger pan and prepare water bath as directed above.

Bake for 1 hour and 10 minutes, then turn oven off and leave in oven and water bath for another 15-20 min. Then remove and allow to cool. Refrigerate 4 hours or overnight.

For the topping combine all ingredients, starting with white chocolate, cream cheese, and sugar; then add in the cool whip and vanilla. Mix well, until smooth. Remove outer edge of spring form pan and frost with topping. Chill for another 4 hours.
Before serving, sprinkle with bits of crushed peppermint bark, crush candy cane pieces, and top with whipped cream.
Enjoy!

Do you have questions or tips you can share with us? OR cheesecake recipe requests?  I’d love to hear them! Please leave a comment!

Good food…for the most part…

1.jpg

December 4, 2017 

Well, sometimes you win some – like grand slam, out of the park – and sometimes you lose some…like big fat flop. In reference to food, we had some of both this weekend.  It had been a while since I had such a baking flop! I was so excited to make Carrot Cake Cheesecake for a special birthday this weekend, as I’ve made it in the past and its super yummy!  I put a teaser on Facebook and couldn’t wait to share a picture of the finished product with you all… but perhaps I was a little too proud of my baking abilities.  It definitely was NOT picture worthy…edible, but not picture worthy.  Honestly, it could have benefited from a few extra minutes in the over (as if 15 extra minutes wasn’t enough already).  Oh well, like I said, ya win some, ya lose some…live and learn.  Thankfully the celebration was with my family and they were all kind and said it was delicious; but I have tasted it when it was delicious and this did not measure up!  Hopefully it will be share-worthy next time I make it! 

On to the things that were share-worthy: 

Fresh sautéed pears over French toast for Sunday morning breakfast hit the spot after a quick 10 mile run.  It was a crisp, beautiful December morning at 30* and another beautiful sunrise.  They aren’t all brilliantly vibrant in color, but they are all beautiful.  The run was exactly what I needed as I felt God ‘fall fresh on me;’ needed to feel renewed and to destress.    

For the birthday celebration my hubby was firing up his new smoker that he built himself a couple months ago.  His tastiest creation so far has been this melt-in-your-mouth, super tender and moist, bursting with flavor, beer-can-chicken.  It is seriously so good- like the grand slam, out of this park good I mentioned earlier; by far the best chicken I’ve ever had.  Honestly, he doesn’t really ‘know his way around the kitchen,’ so for him to prepare two rubs and a marinate to inject into the chickens, all by himself – and have it taste this amazing, I am super impressed!  I’m going to have him share more details on his homemade smoker and beer-can-chicken recipe in the near future….stay tuned. In the meantime, this is for your viewing pleasure (and if there was only a way for you to smell the aroma that lingered around the outside of our house)… 

8.jpg

I also had the pleasure of helping my little chef, Lila, create her own pasta salad side dish to go with dinner…stay tuned for more on that later in the week.  And lastly, my sister-in-law brought the tastiest oven roasted, maple glazed mixture of vegetables; they were so good everyone, including the kiddos asked for seconds! I might be able to share that recipe in the near future as well!  Lots of yummies to be on the lookout for! 

 Finally, here is the recipe for the pears we enjoyed for breakfast.  The recipe was adapted from Annie’s Eats, which is one of my favorite food blogs (she now offers more than just recipes…).  In her recipe the pears are intended for a homemade granola, which I have made before and is very satisfying as well; I would recommend it!  They would also be a great topping for waffles or in a ‘stuffed French toast,’ perhaps on pancakes as well….or even ice cream (sweet after thought)!

2.jpg

Sautéed Pears 

2 Tbsp butter 

5 pears (I used bartlett)  

2-3 Tbsp honey 

1 tsp vanilla 

½ tsp cinnamon 

 Melt butter, add pears, cook over medium heat, stirring occasionally until pears start to soften, edges begin to appear translucent, and juices are released.  Then stir in the honey, vanilla and cinnamon until well combined. Continue to cook a few more minutes.  Enjoy. 

 3.jpg

Breakfast for dinner…

November 20, 2017

Breakfast for dinner? Yes please!  Pancakes and sausage… I have several different flavors of pancakes that I make and my family loves them all!  One of my favorites is the Banana Oatmeal pancake  (Whole Wheat Oatmeal Banana Pancake recipe below) that I made tonight.  They are my favorite because I can eat peanut butter on them! Peanut butter is by far my favorite food; peanut butter ice cream is a close second! (haha) I’m not a fan of syrup – whether its real maple syrup or not; we actually buy the fake sugar free stuff lol.  My husband isn’t a fan of real maple syrup either – I guess we’re both weird.  One year prior to having children, for our Christmas gift to each other we took a long weekend ski trip to Killington, Vermont.  We ate breakfast every morning at this cute little ‘syrup shack’ where you could watch them make their own maple syrup while you dined.  We were probably the only people that didn’t order anything that required syrup!

Anyway, back to dinner – Banana Oatmeal pancakes… would make a good pre-race dinner I suppose, with all those yummy carbs.  Some of our other fav’s, to be shared at a later date include:  Pumpkin, blueberry, peach, and apple. Here’s the recipe, but remember I’m new to this blog stuff and hope to figure it out soon, so for now it’s nothing fancy with a ‘print here’ button or anything. I will try to learn quickly!

Whole Wheat Oatmeal Banana Pancakes

1 cup quick oats
1 cup whole wheat flour
3/4 cup all purpose flour
1/4 cup brown sugar
2 tsp baking powder
1/2 tsp baking soda
1/2 tsp salt
MIX THESE DRY INGREDIENTS, THEN ADD:
2 cups milk
1 egg
2 Tbsp veg. oil
1 tsp vanilla
1 overly ripe banana mashed & another normal banana cut into chunks

Let batter rest 5 min. If using electric griddle I set it to 300*.

They become so fluffy and satisfying – the picture doesn’t do it justice… something else I will try to improve!

Enjoy!